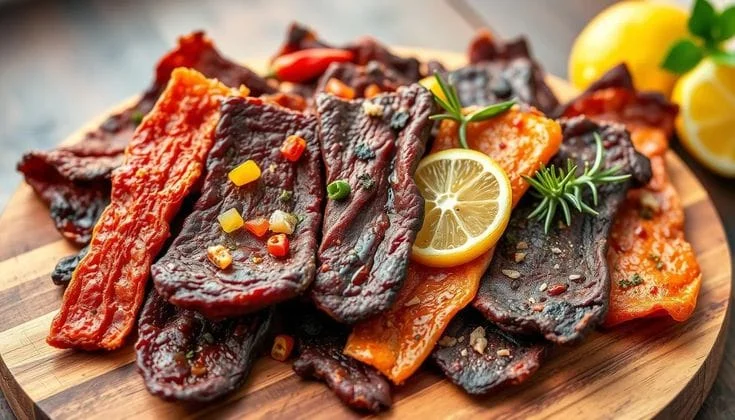

Making jerky in a food dehydrator is simple and rewarding! Here’s a step-by-step guide for flavorful, shelf-stable jerky at home:
Basic Jerky Recipe (Beef or Turkey)
Ingredients:
- 2 lbs (900g) lean meat (top round, flank steak, or turkey breast)
- ¼ cup soy sauce (or tamari for gluten-free)
- 2 tbsp Worcestershire sauce
- 1 tbsp liquid smoke (optional)
- 1 tbsp honey or brown sugar
- 1 tsp black pepper
- 1 tsp garlic powder
- ½ tsp onion powder
- ½ tsp smoked paprika
- ¼ tsp cayenne (for heat, optional)
Steps:
- Prep the Meat:
- Freeze meat for 1–2 hours to firm it up, then slice ¼-inch thick against the grain for tender jerky (or with the grain for chewier jerky).
- Trim all visible fat (fat doesn’t dehydrate well and can cause spoilage).
- Marinate:
- Mix all marinade ingredients in a bowl or resealable bag.
- Add meat slices, ensuring complete coverage. Marinate 4–24 hours (fridge).
- Dehydrate:
- Arrange slices on dehydrator trays in a single layer (no overlapping).
- Set temp to 160°F (71°C) for beef or 165°F (74°C) for poultry.
- Dry for 4–6 hours, flipping halfway (time varies by thickness/humidity).
- Test for Doneness:
- Jerky should bend but not snap, with no moist spots. Blot any grease with paper towels.
- Storage:
- Cool completely, then store in an airtight container with a silica pack (or vacuum seal).
- Keeps 1–2 weeks at room temperature or refrigerated for 1–2 months .
Pro Tips:
- Safety First: For extra protection against bacteria, pre-cook meat to 160°F (beef) or 165°F (poultry) before dehydrating (optional but recommended for poultry).
- Flavor Variations:
- Teriyaki: Swap soy sauce for teriyaki + ginger.
- Spicy: Add 1 tsp chili flakes or sriracha.
- BBQ: Use 2 tbsp BBQ rub + 1 tbsp apple cider vinegar.
- No Dehydrator? Use an oven at its lowest temperature (170°F) with a slightly open door.
Why a Dehydrator Wins:
- Low, even heat preserves nutrients better than oven drying.
- More energy-efficient than running an oven for hours.
How long does dehydrated food last?
The shelf life of dehydrated food depends on storage conditions, moisture content, and the type of food. Here’s a general guide:
Shelf Life of Dehydrated Food
Food TypePantry (68°F/20°C)Fridge/Freezer
Fruits 1 year 2+ years (freezer)
Vegetables 6–12 months 1–2 years (freezer)
Herbs 1–2 years 2+ years (freezer)
Meat Jerky 1–2 months 6–12 months (fridge)
Dried Grains/Beans 10+ years Indefinite (freezer)
Key Factors Affecting Longevity:
- Moisture Content:
- Bone-dry foods (e.g., crackers) last longer than leathery ones (e.g., fruit rolls).
- Use a desiccant packet to absorb residual moisture.
- Storage Method:
- Best: Vacuum-sealed + oxygen absorbers in dark, cool places.
- Good: Airtight glass jars or Mylar bags.
- Avoid: Plastic bags (not fully oxygen-proof).
- Temperature:
- Every 10°F (5.5°C) increase cuts shelf life by half. Store below 70°F (21°C).
- Light/Heat:
- UV light degrades quality—use opaque containers or dark storage spaces.
Signs of Spoilage:
- Mold, off smells, or discoloration → Toss immediately.
- Sticky or soft texture → Rehydrate or refrigerate.
Pro Tips for Maximum Shelf Life:
- Pre-treat fruits/veggies with lemon juice or ascorbic acid to prevent browning.
- Label with dates—first in, first out!
- For meats: Always pre-cook to 160°F (beef) or 165°F (poultry) before dehydrating.
Example:
- Dehydrated apples (vacuum-sealed) can last 5+ years in a freezer but just 1 year in a pantry.
How do you make beef jerky in a food dehydrator?
Making beef jerky in a food dehydrator is easy and rewarding! Here’s a simple, foolproof method for flavorful, shelf-stable jerky at home:

🍖 Basic Beef Jerky Recipe
Ingredients:
- 2 lbs (900g) lean beef (top round, flank steak, or eye of round)
- ¼ cup soy sauce (or tamari for gluten-free)
- 2 tbsp Worcestershire sauce
- 1 tbsp liquid smoke (optional for smoky flavor)
- 1 tbsp honey or brown sugar
- 1 tsp black pepper
- 1 tsp garlic powder
- ½ tsp onion powder
- ½ tsp smoked paprika
- ¼ tsp cayenne pepper (optional, for heat)
🔪 Step-by-Step Instructions
1. Prep the Meat
- Freeze meat for 1–2 hours to firm it up for easier slicing.
- Trim all visible fat (fat doesn’t dehydrate well and can spoil).
- Slice ¼-inch thick strips against the grain for tender jerky (with the grain for chewier jerky).
2. Marinate (4–24 Hours)
- Mix all marinade ingredients in a bowl or resealable bag.
- Add meat strips, ensuring they’re fully coated.
- Refrigerate at least 4 hours (overnight for deeper flavor).
3. Dehydrate
- Arrange strips on dehydrator trays in a single layer (no overlapping).
- Set temp to 160°F (71°C) to safely kill bacteria.
- Dry for 4–6 hours, flipping halfway (time varies by thickness/humidity).
4. Test for Doneness
- Jerky should be leathery but pliable (bends without snapping).
- Blot excess grease with paper towels.
5. Store Properly
- Cool completely, then store in an airtight container with a silica pack.
- Shelf life: 1–2 weeks at room temp, 1–2 months refrigerated, or 6+ months frozen.
🔥 Pro Tips for Perfect Jerky
- Safety first: For extra protection, pre-cook meat to 160°F (71°C) in the oven before dehydrating.
- Uniform slices: Use a mandoline or ask your butcher to slice meat.
- Flavor twists:
- Spicy: Add 1 tsp chili flakes or sriracha.
- Teriyaki: Swap soy sauce for teriyaki + 1 tsp ginger.
- BBQ: Use 2 tbsp BBQ rub + 1 tbsp apple cider vinegar.
- No dehydrator? Use an oven at 170°F (77°C) with the door slightly open.
❓ Why Use a Dehydrator?
- Even drying (no hot spots like in an oven).
- Energy-efficient (runs for hours without overheating).
- Better texture control (avoids overcooking).
Should tomatos be peeled before drying in a food dehydrator?
Whether to peel tomatoes before dehydrating depends on your texture preferences and how you plan to use the dried tomatoes. Here’s a quick guide to help you decide:

Peeling Tomatoes: Pros & Cons
✅ Pros of Peeling:
- Smoother texture: Skins can become slightly tough or leathery when dried.
- Better for powders: Peeled tomatoes blend more evenly when making tomato powder.
- Faster drying: Skins act as a barrier; removing them speeds up the process.
❌ Cons of Peeling:
- Extra prep time: Peeling takes effort (blanching required).
- Nutrient loss: Some antioxidants (like lycopene) are concentrated in the skin.
How to Peel Tomatoes (If Desired)
- Score: Cut a small “X” on the bottom of each tomato.
- Blanch: Dip in boiling water for 30–60 seconds, then transfer to ice water.
- Slip off skins: The skins will peel away easily.
When to Leave Skins On
- For sun-dried-style tomatoes: Skins add chewiness (popular in Mediterranean recipes).
- Quick prep: Skip peeling if you’re short on time or prefer a rustic texture.
- Cherry/grape tomatoes: Often dried whole with skins intact (pierce with a toothpick to speed drying).
Drying Instructions (Peeled or Unpeeled)
- Slice: Cut into ¼-inch thick rounds or wedges (remove seeds for faster drying).
- Pre-treat (optional): Toss with a little salt or vinegar to enhance flavor.
- Dehydrate:
- Temp: 135°F (57°C)
- Time: 6–12 hours (until leathery but not brittle).
- Test: Cool a piece; it should bend without releasing moisture.
Best Uses for Dried Tomatoes
- Peeled: Sauces, soups, or grinding into powder.
- Unpeeled: Snacking, salads, or oil-packed sun-dried tomatoes.
Tip: For cherry tomatoes, dry whole until semi-chewy (“tomato raisins”).
Do it yourself food dehydrator Review:
Food Dehydrator for Jerky Review: Power, Precision, and Perfect Snacks
In a world of store-bought snacks filled with additives, preservatives, and mystery ingredients, doing it yourself has never looked so good. The Food Dehydrator for Jerky with 12 Stainless Steel Trays brings you the power, precision, and simplicity you need to craft homemade, nutrient-rich snacks. Whether you’re drying apples for the kids, kale chips for yourself, or beef jerky for weekend hikes, this dehydrator is your kitchen’s new MVP.
Let’s examine what makes this dehydrator a powerhouse and answer some juicy questions along the way.

How to Make Jerky in this Food Dehydrator (Without Breaking a Sweat)
If you’ve been curious about how to make jerky in a food dehydrator, this machine simplifies the entire process. It evenly dehydrates meat without over-drying or burning with 1200W of power, a rear-mounted fan, and 360° heat circulation. All you need to do is marinate your beef, lay it on the trays, set the temperature (usually around 160°F), and let the dehydrator do it. In 4–8 hours, you’ll have tender, flavorful homemade jerky with zero preservatives.
Are you wondering how to make beef jerky in a food dehydrator like a pro? This model even includes a recipe guide to help you master marinades and timing.
Spacious, Smart, and Stainless
- 12 Trays of Freedom: Whether batch-drying fruits or making loads of jerky, the 12 stainless steel trays (7.9×11 inches each) give you plenty of room to work with.
- Custom Time & Temp: It ranges from 86°F to 190°F and has a timer from 1 to 24 hours, making it suitable for anything from soft banana slices to thick beef strips.
- Quiet Operator: Despite its power, this dehydrator is whisper-quiet. You’ll barely notice it’s on.
- Overheat Protection: Safety first. If the machine gets too hot, it’ll shut off automatically.
And yes, it includes extras: a drip tray, silicone mats, gloves, tools, and even a recipe book.
Should Tomatoes Be Peeled Before Drying in this Food Dehydrator?
A quick pro tip: peeling tomatoes is recommended before dehydrating. It helps them dry more evenly and rehydrate better later. This dehydrator handles tomatoes like a champ—slice, peel (optional but clever), lay them skin-side down, and let the airflow do the work.
How Long Does Dehydrated Food Last? Let’s Talk Shelf Life
With proper storage (think airtight containers or vacuum sealing), most dehydrated foods can last 6 months to a year—sometimes longer! Fruits, herbs, jerky, and even vegetables stay shelf-stable without refrigeration. So this machine makes it easy and sustainable, whether you’re prepping for backcountry hikes, healthy school snacks, or just reducing food waste.
A True Do It Yourself Food Dehydrator for Every Kitchen
What makes this machine perfect for doing it yourself for food dehydrator fans? It’s powerful, safe, intuitive, and durable. Whether you’re drying herbs, making dog treats, preserving garden veggies, or slicing up seasonal fruits, you’re in complete control of the process—and saving money, too.
Final Verdict
This dehydrator is not just a machine—it’s a lifestyle shift. It produces healthier food, less waste, and more flavor. It’s ideal for home cooks, families, homesteaders, and anyone wanting more control over their snacks.